Pool Testing for COVID-19/ পুল টেস্টিং এর মাধ্যমে টেস্টিং এর সংখ্যা বাড়ানোর উপায়।

image-01-bild-mini-pool-methode-michaelschmidt

ছবিটির সোর্সঃ  ১ নাম্বার রেফারেন্স।

  • কিভাবে করোনা ভাইরাস এর উপস্থিতি নির্নয় করা হয়?
    • প্রথমেই সন্দেহজনক ব্যক্তির সোয়াব স্যাম্পল নেওয়া হয় নাকের ভেতর থেকে।
    • স্যাম্পল পরীক্ষাগারে নিয়ে এসে RTPCR ( Reverse transcription polymerase chain reaction) প্রক্রিয়ার মাধ্যমে  করনা ভাইরাস এর জেনেটিক কোড এর উপস্থিতি নির্নয় করা হয়।
    • যদি  করোনা ভাইরাস এর জেনেটিক কোড  এর উপস্থিতি পাওয়া যায় তবে পজিটিভ কেইস হিসেবে রিপোর্ট করা হয়। আর পাওয়া না গেলে নেগাটিভ বা কোভিড-১৯ রোগ নাই বলে প্রকাশ করা হয়।
  • পুল টেস্টিং কিভাবে করা হয়? এর উপকারিতা কি?
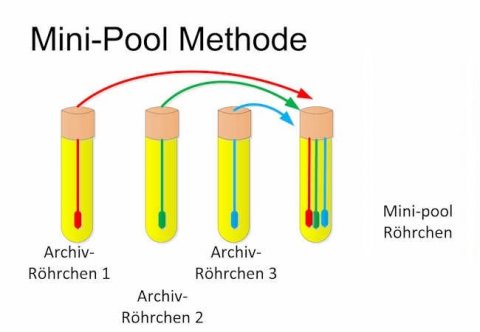
    • সাধারণত  একজন ব্যক্তির রোগ নির্নয়ের জন্য একটি RTPCRটেস্ট করা হয়। এই প্রক্রিয়ায় ৫০  জন সন্দেহভাজনের  জন্য ৫০ টি টেস্ট করতে হবে।  আলাদা আলাদা টেস্ট না করে যদি (উদাহরণস্বরূপ) ৫০ জনের  স্যাম্পল একসাথে মিশিয়ে একটা RTPCR টেস্ট করা হয় তবে সেটা পুল টেস্টিং।অর্থাৎ পুল টেষ্টিংএর মাধ্যমে একসাথে একটি কিট ব্যবহার একবার RTPCR টেস্ট পরিচালনা করে অনেকজনের টেস্ট করা সম্ভব।
    • এই প্রক্রিয়ার সবচেয়ে বড় সুবিধা হচ্ছে একসাথে অনেক জনের (প্রায় ৬৪ জনের একসাথে)  টেস্ট করা যায় । এতে টেস্টিং খরচ অনেক কমে এবং দ্রুততম সময়ে অনেকের টেস্ট করা সম্ভব হয়। টেস্ট রেজাল্ট যদি নেগাটিভ হয় তবে সকলকে একসাথে বলে দেওয়া যায় যে তাদের  দেহে করোনা ভাইরাস নাই। আর যদি পজিটিভ হয় তবে আবারো ছোট ছোট ভাগে ভাগ করে অল্পসংখ্যক অতিরিক্ত টেস্টের মাধ্যমে নির্নয় করা যাবে কার দেহে করোনা ভাইরাস এর উপস্থিতি আছে আর কার দেহে নাই।
    • সবচেয়ে বড় অসুবিধা হচ্ছে যদি সংক্রমনের হার খুব বেশি থাকে তবে  এই প্রক্রিয়ায় টেস্ট করে খুব একটা লাভবান হওয়া যায় না। প্রয়োজনের অতিরিক্ত টেস্ট করা লাগতে পারে। যারা এখনো সংক্রমিত হয় নাই তাদের খুঁজে বের করার জন্য পুলটেস্টিং খুব কার্যকর ভূমিকা পালন করতে পারে।
  • কোন কোন ক্ষেত্রে পুল টেস্টিং সহায়ক ভূমিকা পালন করতে পারে?
    • আগেই বলেছি, প্রবলভাবে অথবা একেবারেই সংক্রমিত হয়নি এমন জনগোষ্ঠী নির্ণয়ের   ক্ষেত্রে পুল/ গ্রুপ টেস্টিং শক্তিশালী ভূমিকা পালন করতে পারে। উদারনসরূপ ধরা যাক, একটা হাসপাতালে একজন রোগী অজানা কারণে মৃত্যুবরণ করল। তার উপসর্গ বিবেচনায় রেখে টেস্ট করে দেখা গেল যে রোগীর দেহে করোনা ভাইরাস এর উপস্থিতি ছিল। বিষয়টি খুব উদ্বেগের সাথে পর্যালোচানা করে সিদ্ধান্ত নেওয়া হলো, সকল ডাক্তার, নার্স, টেকনিশিয়ান যারাই রোগীর  সংস্পর্সে (প্রত্যক্ষ বা পরোক্ষ)  এসছেন সাবাইকে ১৪ দিনের কোয়ারেন্টিনে পাঠিয়ে দিতে হবে। সাথে হাসপাতালটি লক-ডাউন করা হল। এই চিত্রটির সাথে কমবেশি আমরা সকলেই পরিচিত। কারণ বাংলাদেশে বর্তমানে এভাবেই পরিস্থিত মোকাবেলা করা হচ্ছে। এতে সবচেয়ে বড় সমস্যা হচ্ছে,  একসাথে অনেক অনেক স্বাস্থ্যসেবাকর্মী সিস্টেমের বাইরে থাকতে হচ্ছে। এমনিতেই আমাদের ডাক্তার, নার্সদের সঙ্কট আছে। তার উপর যদি এভাবে কয়দিন পর পর ১০-২০ জন করে কোয়ারিনটিনে পাঠিয়ে দিতে হয় তবে চিকিৎসাসেবা নিশ্চিত করার জন্য পর্যাপ্ত সেবাদান কর্মী পাওয়া মুশকিল হয়ে পড়বে। এমত অবস্থায় পুল টেষ্টিং আমাদের যেভাবে সাহায্য করতে পারেঃ
      • সন্দেহভাজন সকলের স্যাম্পল কালেকশন করে পুল টেস্টিং করে প্রথমেই যাচাই করে নেওয়া যায় তাদের মধ্যে অন্তত একজনও  আক্রান্ত কিনা।
      • যদি পুল টেস্টিং এর ফলাফল নেগেটিভ হয় তবে সকল স্বাস্থ্যসেবা কর্মী নিরাপদ এবং আগের মত সেবাদান অব্যহত রাখতে পারবেন।
      • যদি পুলটেস্টিং এর ফলাফল পজিটিভ হয়, তবে সকলকে কোয়ারেনটিনে রেখে অতিরিক্ত আরো কিছু টেস্টের মাধ্যমে আক্রান্ত ব্যক্তিকে নির্দিষ্ট করে স্বল্প সময়ের মধ্যে  বাকিদেরকে  সেবাদানে ফিরিয়ে  আনা সম্ভব।
    • একই  উপায়ে অন্যান্য ক্ষেত্রেও গুরুতপূর্ণ ব্যক্তিদের কোয়ারেনটিনে থাকার সময় কমিয়ে আনা সম্ভব যা সেবা কার্যক্রম অব্যহত রাখতে সাহায্য করবে।
    • অনুরূপভাবে  কোন একটা বিল্ডিংএ যদি একজন আক্রান্ত রোগী পাওয়া তবে বাকিদের স্যাম্পল নিয়ে পুল টেস্টিং করে নির্ণয় করা যাবে অন্যরা আক্রান্ত কি না।
    • বিদেশ থেকে আগত ব্যক্তিদের ক্ষেত্রেও পুলটেষ্টিং মাধ্যমে কর্যকরী কোয়ারেনটিন নিশ্চিত করা সম্ভব।
    • পুল টেস্টিং ের মাধ্যমে আক্রান্ত এলাকায় অনাক্রান্ত অংশ বা আরিয়া সহজেই আলাদা করা সম্ভব।

জার্মানি, ইজরায়েল ও ইন্ডিয়া পুলটেস্টিং প্রক্রিয়ার মাধ্যমে তাদের টেস্টিং ক্যাপাসিটি বাড়ানোর কার্যক্রম শুরু করেছে। আমাদের দেশের  পরিপ্রেক্ষিতে পুল টেষ্টিং দারুণ সুফল বয়ে আনতে পারে। যেহেতু আমাদের কিট স্বল্পতা আছে, পুল টেস্টিং আমাদের জন্য আদর্শ উপায় হতে পারে  অধিক টেস্টিং নিশ্চিত করার ক্ষেত্রে।

সামাজিক দূরত্ব বজায় রাখুন। যথা সম্ভব ঘরে থাকুন। নিজেকে সুস্থ রাখুন। অন্যকেও নিরাপদ এ রাখুন।

নোটঃ

আমি মলিকূলার বায়োলজিষ্ট নই।RTPCR টেস্ট আমি কখনো করিনি।  রেফারেন্সে দেওয়া তথ্যসূত্র পড়ে এবং নিজের কিছু অর্জিত জ্ঞান একীভূত করে নিজের মতামত প্রকাশ করেছি। এই প্রক্রিয়ায় আরো অন্যান্য জটিলতা থাকতে পারে যা হয়ত এই রেফারেন্সগুলতে প্রকাশিত হয়নি এবং আমি এখনো জানি না। এবং ওই সকল জটিলতার কারণে হয়টা বাংলাদেশে এই প্রক্রিয়ায় টেস্টিং সম্ভব নাও হতে পারে। আইইডিসিআর নিশ্চয়ই বিষটি সম্পর্কে সচেতন আছেন।    বিস্তারিত তথ্যের জন্য এবং সত্য যাচাই করার জন্য সকলকে নিমোক্ত রেফারেন্স গুলা পড়ে দেখার অনুরোধ রইল।

রেফারেন্সঃ

১। pool-testing-of-sars-cov-02-samples-increases-worldwide-test-capacities-many-times-over

২। https://healthcare-in-europe.com/en/news/corona-pool-testing-increases-worldwide-capacities-many-times-over.html

৩। https://economictimes.indiatimes.com/news/politics-and-nation/uttar-pradesh-to-start-pool-testing-for-covid-19-to-expedite-process/articleshow/75122742.cms

৪। icmr-suggests-pool-testing-to-increase-number-of-coronavirus-tests-cut-costs-5143921.html

৫। story-eD4ZiGlrdaynBRPSebpJoO.html

৬। https://theprint.in/india/andaman-nicobar-has-started-conducting-pool-tests-for-covid-19-first-in-the-country/400112/

সি প্রোগ্রামিং এ “scanf(“%d”, &x )”এ কেনো “&” ব্যবহার করা হয় ( Why do we use “&” in “scanf(“%d”, &x)” )?

যেকোন ভেরিয়েবল এর  আগে & বসালে, সেই ভেরিয়েবল এর মেমরি অ্যাড্রেস কে নির্দেশ করে। আর scanf() ফাংশনের  মধ্যমে ইউজার এর কাছ থেকে ইনপুট নিয়ে ভ্যারিয়েবল এর  মেমোরি লোকেশন এ রাখা হয়। আর এই কারণেই ভেরিয়েবল এর আগে & ব্যবহার করা হয়।

Example 1:

#include

int main()
{
int x;
scanf(“%d”, &x);

printf(“%d”,x);
return 0;
}

উপরের উদাহরনে, scanf(“%d”, &x); এই ফাংশনটাতে &x এর মাধ্যমে x ভেরিয়েবল এর লোকেশনকে পয়েন্ট করে। সহজ কথায়, x হচ্ছে মান আর &x হচ্ছে মেমরিতে অবস্থান। 

scanf(“%d”, &x); এই ফাংশনটাতে &x এর বদলে যদি x ব্যবহার করা হয় তবে প্রোগ্রামটি রান করবে না । কারণ শুধু x কোন মেমরি লোকেশন কে পয়েন্ট করে না। তাই scanf(“%d”, x); কাজ করবে না।

How to install google Tensorflow in your windows machine using docker Image

I am going to write about how to install the recent google tensorflow in your windows Machine. Right now the current distribution does not have any direct installation process for windows. But Tensorflow can be hosted using its docker image that has been cited in the main site.

The instructions here are compact versions of the instructions after I Installed following  this blog from Caffinc

The steps are as followed:

  1. Download Docker toolbox from here
  2. Install Docker as described here. If you have virtual box installed previously  uncheck the Virtual box installation. Also stop VirtualBox before starting installation.
  3. After you finish installation, start Docker Quick Start Terminal. The icon should be on your desktop. It will take a bit of time to settle. You will find the name of your machine and $ sign when its ready for work.

At this point you are done with installing Docker Tool Box.

Now follow the steps to pull Tensorflow Image on Docker. Google has released two versions for Docker. One is light weight and Another is Full version. The process is same only the docker  location is different.

Follow the following steps:

  1. In your Docker Terminal, write

docker pull   b.gcr.io/tensorflow/tensorflow           //for light weight tensorflow

docker  pull  b.gcr.io/tensorflow/tensorflow-full      //for full version

  • Then check the docker image repository  by the command:

docker images

  • In  your image repository you will find tensorflow and IMAGEID
  • And now issue the command :

winpty docker run -it       Tensorflow_Image_Id_you_Have_Noted_Down

That’s it.  You will be taken to the root prompt and now you can call python from here and start working with tensorflow commands.

Have a nice day!!

Setting up your Python Environment for Machine Learning

Python has become a language for both researchers and developers. It is the ideal language for rapid prototyping of your thoughts. It has become the first choice for machine learning as well as for data science. Therefore you might be interested in python for many such reasons.

In my opinion, the first thing before learning a language is to set up its development environments meaning installing compiler, dependencies and IDE (Integrated development Environment).  There are many different ways for people with different level expertise.

Here I am going to discuss about setting up python environment with minimal effort and complexity and how to get required packages for Machine Learning and Data Science. As I am working with windows, the following steps are for Windows.

Step 1: Get the Python compiler and IDE. Currently there are two major version of Python: Python 2.7 and Python 3.4. Python 3.4 is not yet fully flourished. I mean not all packages are compatible with python 3.4. So I suggest you to start with Python 2.7.

To ease this process, I would strongly  recommend to use Canopy Express. Its free, pre-build with python 2.7 and comes with 100+ essential and useful packages that would make your life easy. The installation is just double click magic 🙂

Step 2: Its highly recommended that you set your environment variable(Path variable) for Python.

Step 3: Now start Canopy Express and run  a hello world code. Voila!!!!!! You are done with primary python setup.

Step 4: Next step is to look for the installed Python packages. Click on the Package managers  then Installed Packages. You will find that essential python packages like numpy, scipy,matplotlib etc are already installed. Actually all the major machine learning libraries are build upon these three core python packages.Make sure you have “pip” package installed. Pip is for installing python packages from online repository. So you are almost done the dependencies installation. Life is Beautiful, isn’t it??

A bit more way to go. Look at the available packages. Scroll down and which ever you find interesting just install it clicking right there.

The Packages that are mostly important for Machine Leaning, data Mining and Data Science are as follows:

  1. Scikits Learn for Machine learning Algorithms
  2. Pandas For Data Analytic tasks
  3. Crab for Recommendation system
  4. NLTK for Natural Language Processing Tool Kit

Of course not limited to these. There are lot of libraries.

The important case is if you don’t have a library under canopy but yet its important for you, how will you get it??

The answer is simple. Start Canopy, Go to Tools->Canopy Command Prompt. and a black screen like windows command prompt will appear. Just Write  “pip install Package-name”. For example to install NLTK,  “pip install -U nltk”. For most cases you find this command in package webpage.

There is a difficulty installing Crab. It has a dependency with scikit learn and visual C++. To to make life easy, Just Install Visual Studio Express which is free and you can install it from Microsoft directly. Set the path variable appropriately.

After that run the command:                         pip install -U crab.

If its not working yet, Follow the following steps: a bit notorious:

  1. Install minGW cross platform gcc. I installed codeblocks-13.12mingw-setup.exe. it has mingw32 inside. Set the environment variable.
  2. Download the Crab Code base from Github: https://github.com/muricoca/crab
  3. Unzip and rename to a suitable name say Crab.
  4. open the folder and the find the setup.cfg file.  the content of the file should be changed as follows:

    [build]

    compiler=mingw32
    [build]

    compiler=mingw32

  5. Open Windows command prompt in this folder. SHIFT+Right Click -> Open Command Line here. 
  6. Write python setup.py install
  7. By now you should have your Crab install and ready to work.
  8. If not please consult this page for other options:  http://muricoca.github.io/crab/install.html#installing-an-official-release

By now you have your python environment set for working with basic machine learning algorithms.

Boolean Model of Information Retrieval

A very primitive model but still interesting to start with information retrieval Techniques. Lets start with an example:

Consider we have 3 documents namely D1, D2 and D3. And the contents that these 3 documents contain are as follows:

D1: Shipment of gold damaged in a fire
D2: Delivery of silver arrived in a silver truck
D3: Shipment of gold arrived in a truck

The term vocabulary we are considering is as follows:

V={Fire, Gold, Silver, Truck}

Term Vocabulary is a list of terms/words we want to allow users to search. For real application, Its can be as large as  full English Dictionary.

Now the first steps is to build the Term X Doc Matrix which as follows:

Term   D1 D2 D3

Fire      1   0      0

Gold     1   0     1

Silver    0   1     0

Truck    0    1     1

The Matrix is pretty intuitive. cell contains 1 representing the presence of the term in the respective document otherwise it is 0.

Thus we have the binary representation of the terms are as follows:

Fire: 100, Gold: 101, Silver: 010, Truck: 011

This part is offline processing. Now the online query processing.

Lets say some one want query something that is transformed into following logical relation of the containing terms:

Query 1: (fire OR gold) AND (truck OR NOT silver)

Now if we transform the above relation into Boolean form, we have the following:

( 100 OR 101 ) AND (011 OR NOT 010)

= ( 100 OR 101 ) AND (011 OR 101)

= 101 AND  111

= 101

Now we have some binary bits. But how can we interpret this bits??

Pretty Simple. 1 indicates the documents to be retrieved as result of the query.

In this case, the search result will populate the documents D1 and D3 as indicated by the 1 in first and third position.

Similarly, we can perform the following search.

Query 2: (fire OR NOT silver) AND (NOT truck OR NOT fire).

(100 or not 010) and (not 011 or not 100)

= (100 or 101) and (100 or 011)

= 101 and 111

=101

One disadvantage of Boolean model is that it can answer only the presence or absence of terms. No way to answer in probabilistic way as the modern search engine works